Boy has it been a busy month!
There has been a lot of this going on.....all three boys moved bedrooms.....much cleaning and painting, getting things ready for the baby.
(Becket was super excited to help paint his new room. Being unable to hand over control of stuff, I didn't want him to REALLY paint the wall. So I gave him a small trim roller for his paint. He worked happily away for a long time, then we re-coated the area for a solid look later.)
I've actually done a decent amount of quilt and baby sewing as well. Just haven't had the time to photo and post them yet.
But, I got an email asking about how I squared up my large, purple quilt blocks - they were larger than my biggest square ruler. I already had several pictures on my computer, and have ditched the photoshop editing part of my process in the interest of actually getting this posted!
The challenge here is a block that needs to be 24.5" square, my largest square ruler being 16.5".
Also, for the finished quilt to look just right, the white sashing needed to be perfectly centered in both directions.
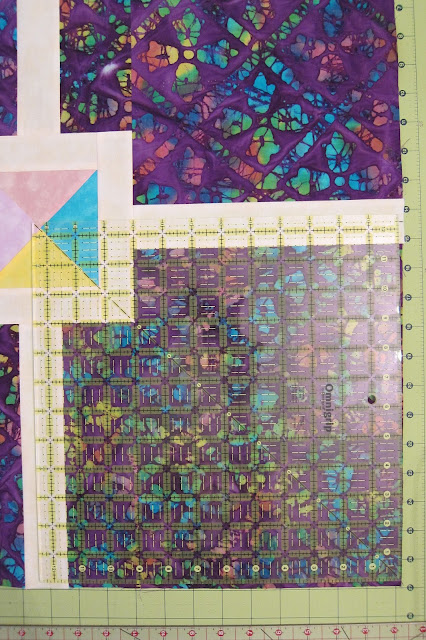
To get all this done, I used a largish square ruler, my cutting mat, and a couple other 26"+ long, narrow rulers.
Start by marking what you want to be the center, on one of the block's edges.
You can see here that I used my Frixion pen. Ironically, the email I got asking about how I accomplished this squaring up was asked by a quilter that had originally found my blog as she searched for information about the Frixion pen! This is one of the two ways I actually DO use it on my fabrics. All the marks are in the seam allowance, or trimmed away.
My block needed to be 24.5" square, so I needed to measure OUT FROM this center point, half the size of my block - which is 12.25".
Please ignore the next two photos that need to rotate. Part of the annoying blogger thing and how it randomly deals with unedited pictures.
I have my ruler lined up so that the 12.25 mark is at the center point of the block. ALSO the vertical and horizontal are both aligned squarely.
Better view in that picture above - What is important is that those parts of the block are as near perfect in both directions. That way the finished design looks like a square, and not a wacky, slanting rhombus or something.
Now, the tricky part.
Especially for those of us who are cursed with slipping ruler syndrome.
Hold your big square, and carefully slide a long ruler up against it, without shifting anything. I would re-check the 12.25" mark and the squareness of that yellow ruler after getting the long ruler in place.
Oh, must be noted, I am right handed. And I am totlaly unable to cut with my left.
If you can cut with your left, remove the first ruler (the square yellow one, in my case), hold the long ruler in place, and trim your block.
For myself, I carefully moved away the square, replaced it with yet another 26"+ long ruler - moved that second one out of the way - and then trimmed my block.
Did you get that? It's a bit of swapping back and forth, and I'm lucky to have a big stack of rulers.
Those steps take the longest. The point of them being getting yourself a starting point that puts the center exactly in the middle and the first edge perfectly square with your piecing.
Let's get the last three sides done.....
Using your cutting mat, line the nice edge you just made up with one of the ruled markings.
Check that it's nice and straight, top to bottom.
Count over to the other side, the full width of your finished block.
I had to go over 24.5"
Use a long ruler and the markings on your mat to perfectly cut the block, ending up with one set of perfectly parallel sides.
...Ugh, another sideways photo.....
Anyway, we are going to do the process again, for the last two sides. WITH ONE DIFFERENCE.
After you mark the center of the sashing, you need to measure over that same half distance as before. 12.25" in my case.
INSTEAD of lining up your square ruler with the block piecing, you now line it up with one of the two sides we already cut. I used two large squares to double check I was in exact center, because I'm Type A like that. Do not freak out if your outside edge alignment and the block piecing alignment are just a bit off. For me, an 1/8" drift was not visually obvious in the end. I did have one mess of a block, I have no idea what I was doing as I pieced. The sashing angled nearly 3/8" off center from side to side. I re-made that block.
After you trim this third side, line it up on your cutting mat again and measure over the full block width for your last cut.
Ta-Da! Perfectly square and centered, huge quilt block.
I'm thinking this all will make more sense if you are reading and cutting at the same time. It's a bunch of shifting and rulers. But I hope it helps!
Ask away with questions on any horribly confusing stuff, and I'll try to make things clear.


