I have been putting off finishing my Halloween swap blocks because they were so labor intensive. (I know, doesn't make much sense, but there we are) I used this awesome tutorial and loved how the one fully finished block looked, but the end process of turning it into a candy corn shape was tricky due to the tight curves. (Sorry, looks like the linked tutorial blog is dead...)
While reading Kris' blog, I found a new way to make my shapes and I love it! I thought I would do a little tutorial to help remind myself how easy it is to make any pieced shape.

First, join several fabric strips together so that they are at least 1/4" larger overall than your final shape. I pressed all those seams open for a smoother piece.
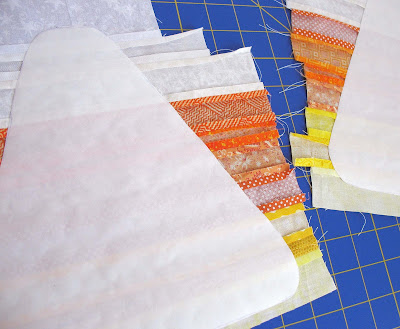
Then I cut my candy corn shape from freezer paper. It is much easier to quickly press the shape onto your strips than to trace around a template, and it is reusable. Plus it gives all those strips a bit more stability while sewing the curves and you don't have to worry about your drawn line showing on the finished product later. Dry press the freezer paper to your strips, with at least a 1/4" extra all around.

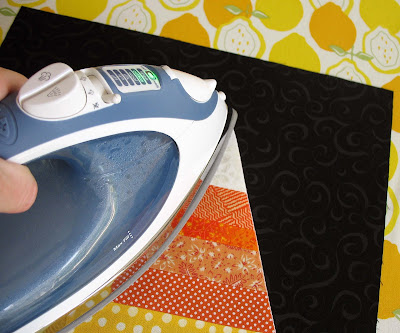
Pin your strips to a piece of light weight fusible interfacing. The right side of the strips should be touching the bumpy, iron-on side of the interfacing. DO NOT do a quick touch-up with the iron on those strips. The interfacing will stick to the nice side of your shape and it will be toast. Ahem.
 Carefully sew just outside your freezer paper shape.
 Once you're all the way around, peel off the freezer paper and save for re-use.
Now trim all around your shape, leaving about 1/4" seam allowance. Then clip/notch curves or points for a smooth finished edge.


VERY CAREFULLY cut a slit in the center of your interfacing, and start to turn....

Pull everything through and gently poke out all the edges. I used a very light weight interfacing, and it tended to tear at that center cut if I pushed too hard. Also, if you poke too hard you'll rip through your edge seam.
Now place your shape onto the background fabric, and dry press to stick in place. Stitch around the edges however you please - I neatly top stitched all around.
 We are supposed to label your blocks on the front for the Halloween Swap - I use a fabric dye pen that doesn't bleed. If I was worried about bulk, I would have trimmed the extra black fabric out from under the candy corn. I didn't think it was necessary, all was nice and smooth!


Pull everything through and gently poke out all the edges. I used a very light weight interfacing, and it tended to tear at that center cut if I pushed too hard. Also, if you poke too hard you'll rip through your edge seam.

Now place your shape onto the background fabric, and dry press to stick in place. Stitch around the edges however you please - I neatly top stitched all around.
 We are supposed to label your blocks on the front for the Halloween Swap - I use a fabric dye pen that doesn't bleed. If I was worried about bulk, I would have trimmed the extra black fabric out from under the candy corn. I didn't think it was necessary, all was nice and smooth!
Sit back and admire your pieced applique shape! The whole thing took a small fraction of the time I spent on the first block and I love how neat the edges are. I think the blocks will quilt up beautifully!
21 comments:
great job...looks so cute!
Incrdibly helpful! Thank you x
Great tutorial.
Thanks!!
These look great! The freezer paper is such a good idea! I also like the tip about not re-pressing the seams... I was totally tempted to do this myself. :)
What I think is funny about this method is that I guess Heather Ross teaches it in her classes. So I guess the woman has it all, great fabric and great tips!
what fun....that is a great tutorial!
Very cool!!! Thank you for sharing:)
Great tutorial!
Thanks for taking the time to share with us!
Oh I love the block and I am sooo going to try that, what a great idea!!
What a neat tip. I'll have to remember that next time I'm doing applique. Thanks for sharing. Jenn
Oh my GOSH, those are cute! And what a GREAT idea!! Your swap buddies are gonna love em!
This is such a great idea! I learned this once a while ago but the refresher was really helpful.
I was trying to do this on pieces that were only 1/4" wide at points. Is that just too small, or was I missing something? I had a really hard time with it.
Your blocks look great! I'll use your tips to make a candy corn for my quilt. I don't think I have one in my group. Thanks for the idea and the great tutorial!
Love this block and tute!
Thanks!!
Thank you so much for sharing. I needed this kind of info to finish a quilt my deceased mother law didn't finish for my daughter. I have been too scared to attempt.
This would make a really cute pillow. I would like to make something like this for my daughters college apartment. She could put it on her couch for Halloween this year 2011.
This is fabulous... thanks for the tutorial.
thank you thank you
Exellent.Serbia.
quick question: do you adhere the freezer paper to the wrong side of your piece?
Nicole- Yes the freezer paper is ironed to the wrong side of your project. The interfacing will go onto the right side.
Post a Comment