Showing posts with label tools. Show all posts

Monday, February 01, 2021

Rotary Cutter Protection : Science Fair Time!

{Eeek!  covid got us the day before Christmas.  We are all recovered, it wasn't fun, and sewing is just getting going again.  Lessons from teaching Mara to sew are finally under way and coming here soon.}

But for now...

It's science fair season.  

I have a mini experiment I stumbled into and now I'm looking to crowd source my quilty friends for the best rotary cutting glove.

Knock on wood!  Many years, tons of quilts and things made, I haven't hurt myself with the rotary blade beyond a couple tiny nicks.  I cringe every time I see a friend post about their severed finger tips and ER visits.

Beyond the catastrophic accidents, changing a blade is a little harrowing as well. 

I have a whole process that involves paper towels and methods for sliding the stack of new blades apart without slicing my finger tips.  You totally have to hold your breath the whole time.  It's tense!

So, I did some searching for strong cut resistant gloves that also left me enough dexterity to change a blade.  I was excited to find some that looked great and also have anti-slip grip.  The gloves just arrived, and they sent the wrong size.  Booo.  

Then I decided to use one of them to conduct a little experiment.


Fail.

I thought maybe I had pushed a little too hard.  So I tested on a finger tip, as if I was cutting fabric and accidentally ran over my finger. 
 

Not.  Good.

My thread snips also cut into them.  So disappointed.

Since they were advertised as usable in the kitchen - they are food grade materials and washable - I tested knives on them.  


Interestingly, the glove totally protected against both my sharp chef knife and serrated bread knife.  I gave a good go with each, sawing away. Not a thread frayed.  

Thinking maybe it was the pressure of the scissor action and my downward rotary blade force, I tried cutting the glove with my chef knife - placing the front end and pivoting down with the handle.  Like when you're cutting carrots.  Still not a nick!  

I'm now on the search for what type of glove works against a rotary blade.  I would love to try to dice up a kevlar glove and several others, although it would become pricey very quickly with the kevlar if they keep failing.

What have you found?  Anything you know to work for sure?


Monday, April 29, 2013

Huge Quilt Block Squaring Up - one way how

Boy has it been a busy month!

There has been a lot of this going on.....all three boys moved bedrooms.....much cleaning and painting, getting things ready for the baby.

(Becket was super excited to help paint his new room.  Being unable to hand over control of stuff, I didn't want him to REALLY paint the wall.  So I gave him a small trim roller for his paint.  He worked happily away for a long time, then we re-coated the area for a solid look later.)


I've actually done a decent amount of quilt and baby sewing as well. Just haven't had the time to photo and post them yet.

But, I got an email asking about how I squared up my large, purple quilt blocks - they were larger than my biggest square ruler. I already had several pictures on my computer, and have ditched the photoshop editing part of my process in the interest of actually getting this posted!


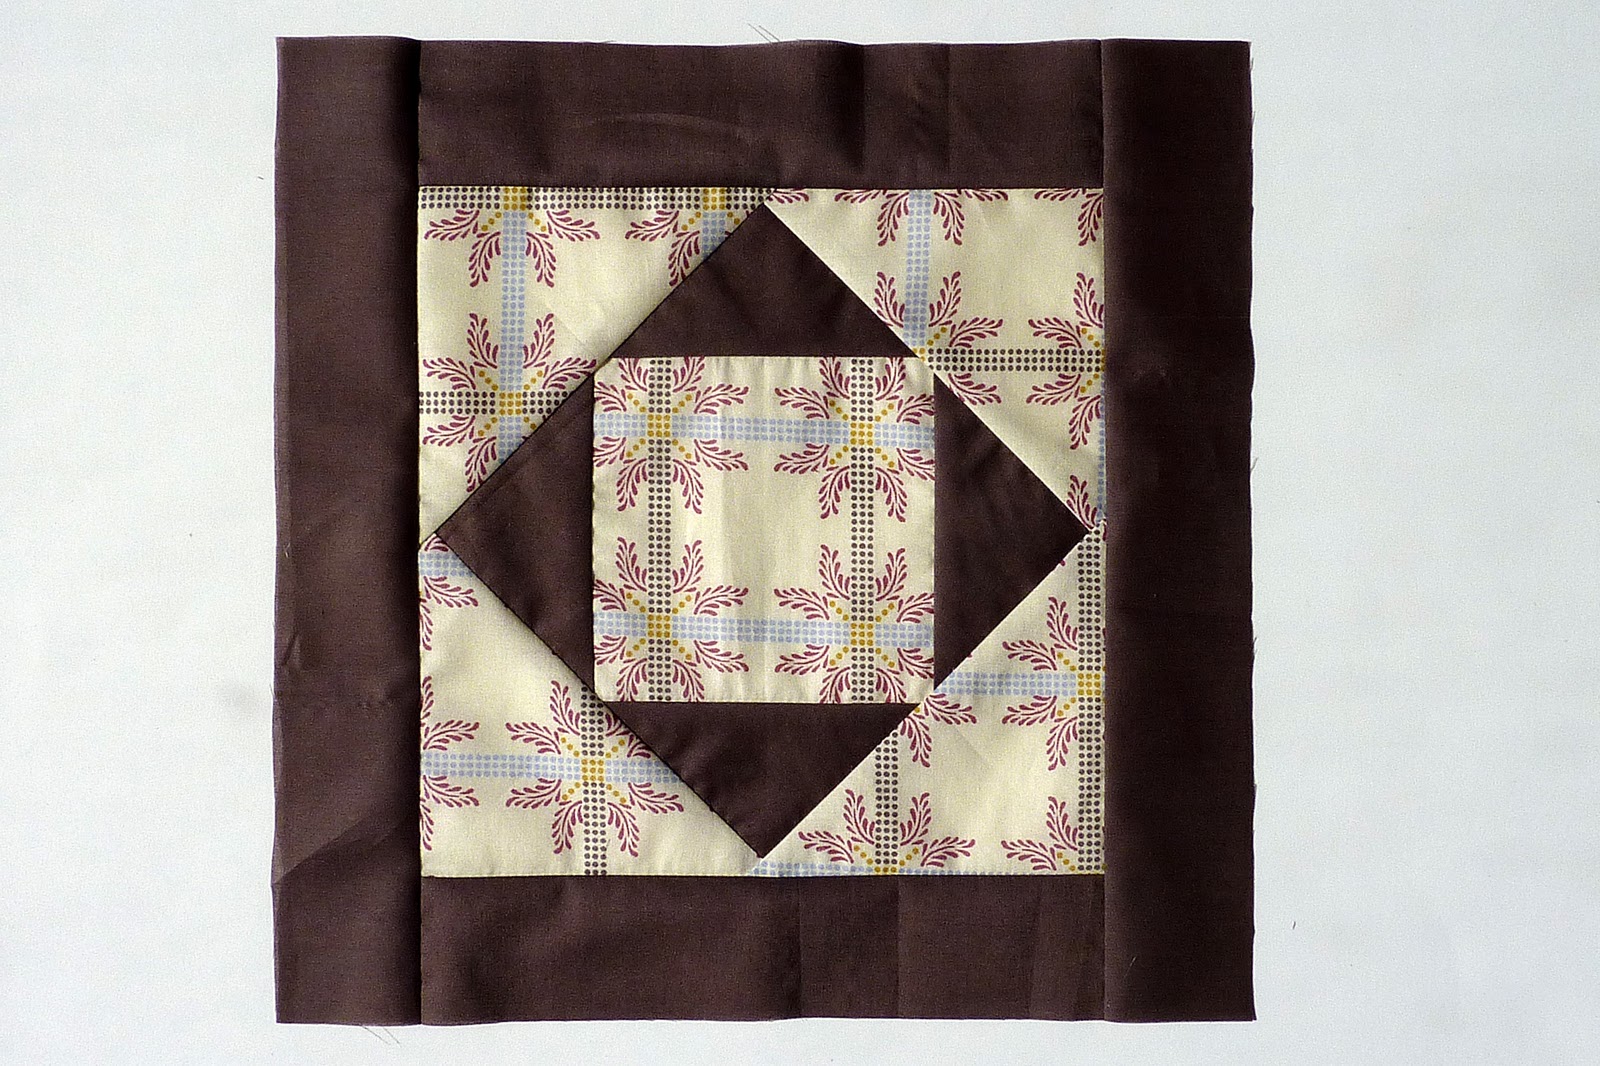
The challenge here is a block that needs to be 24.5" square, my largest square ruler being 16.5".

Also, for the finished quilt to look just right, the white sashing needed to be perfectly centered in both directions.

To get all this done, I used a largish square ruler, my cutting mat, and a couple other 26"+ long, narrow rulers.


Start by marking what you want to be the center, on one of the block's edges.

You can see here that I used my Frixion pen.  Ironically, the email I got asking about how I accomplished this squaring up was asked by a quilter that had originally found my blog as she searched for information about the Frixion pen!  This is one of the two ways I actually DO use it on  my fabrics.  All the marks are in the seam allowance, or trimmed away.


My block needed to be 24.5" square, so I needed to measure OUT FROM this center point, half the size of my block - which is 12.25".


Please ignore the next two photos that need to rotate.   Part of the annoying blogger thing and how it randomly deals with unedited pictures.

I have my ruler lined up so that the 12.25 mark is at the center point of the block.  ALSO the vertical and horizontal are both aligned squarely.


Better view in that picture above - What is important is that those parts of the block are as near perfect in both directions.  That way the finished design looks like a square, and not a wacky, slanting rhombus or something.


Now, the tricky part.

Especially for those of us who are cursed with slipping ruler syndrome.

Hold your big square, and carefully slide a long ruler up against it, without shifting anything.  I would re-check the 12.25" mark and the squareness of that yellow ruler after getting the long ruler in place.

Oh, must be noted, I am right handed.  And I am totlaly unable to cut with my left.

If you can cut with your left, remove the first ruler (the square yellow one, in my case), hold the long ruler in place, and trim your block.


For myself, I carefully moved away the square, replaced it with yet another 26"+ long ruler - moved that second one out of the way - and then trimmed my block.

Did you get that?  It's a bit of swapping back and forth, and I'm lucky to have a big stack of rulers.

Those steps take the longest.  The point of them being getting yourself a starting point that puts the center exactly in the middle and the first edge perfectly square with your piecing.

Let's get the last three sides done.....


Using your cutting mat, line the nice edge you just made up with one of the ruled markings.

Check that it's nice and straight, top to bottom.


Count over to the other side, the full width of your finished block.

I had to go over 24.5"

Use a long ruler and the markings on your mat to perfectly cut the block, ending up with one set of perfectly parallel sides.


...Ugh, another sideways photo.....

Anyway, we are going to do the process again, for the last two sides.  WITH ONE DIFFERENCE.

After you mark the center of the sashing, you need to measure over that same half distance as before.  12.25" in my case.

INSTEAD of lining up your square ruler with the block piecing, you now line it up with one of the two sides we already cut.  I used two large squares to double check I was in exact center, because I'm Type A like that.  Do not freak out if your outside edge alignment and the block piecing alignment are just a bit off.  For me, an 1/8" drift was not visually obvious in the end.  I did have one mess of a block, I have no idea what I was doing as I pieced.  The sashing angled nearly 3/8" off center from side to side.  I re-made that block.

After you trim this third side, line it up on your cutting mat again and measure over the full block width for your last cut.


Ta-Da!  Perfectly square and centered, huge quilt block.

I'm thinking this all will make more sense if you are reading and cutting at the same time.  It's a bunch of shifting and rulers.  But I hope it helps!

Ask away with questions on any horribly confusing stuff, and I'll try to make things clear.


Tuesday, June 05, 2012

Nature, Nurture, or OCD?

So funny!

I noticed that I had a few blog posts still in draft mode and clicked to see what they were. I had to laugh at this from TWO years ago.

I had just received my Kona color card and was what seemed like abnormally excited about it. I could identify, sort and stack my kona pieces.


Then Becket asked for lunch. No normal ham sandwich for him!

He wanted his lunch "Sorted Please".

.

Tuesday, May 29, 2012

Pilot Frixion Pen : Sewer's Warning

I've seen these new Pilot Frixion erasable gel pens come up a couple times as a good, removable fabric marker for quilters.

They're made for paper.  But not checks or legal documents!


While I have a white ceramic pencil that I love for darks, I still haven't found a tool I love for marking light fabrics.  Plus, at less than $2 a pen, you can't beat the price.

But a PEN.  Really?  I wasn't so sure.

I set up some experiments.


Kona white.  The words Rub and Iron, along with the squares, are on there with a sharpie.  That way I could keep track of exactly where I made the Frixion marks.


The second a hot iron hits that pen, the mark vanishes.  Actually pretty fun!

For paper, there's a little nub on the end of the pen that you rub over the writing to get it to vanish.  The heat of the friction is what makes the pen go away.  Didn't really work on fabric, but thought I would give it a try.  Rubbing with my finger didn't heat it up enough to get it to go away either.


But, can you see that up there?  The color is gone, but the gel is still on the fabric.  It left a faint white ghost behind.

I did this on a scrap of color, and the ghost line was there, too.  But it isn't white...it's a, I don't know, ghost?  Couldn't get it to photograph but you can see it from an angle.  (Probably wouldn't bother anybody else but a neurotic like me.)

Now, some poor souls have lost their class notes or other important stuff due to leaving their paper in a hot, summer car.  That level of heat erases the ink.  They suggest putting your paper into a sub 14degree place to get the ink back.


So, my fabric bit went into the freezer with my pizzas and waffles.  After only 5 minutes, the mark came back!

Eeek!

And it didn't go away once the fabric warmed up again.  You had to hit it with the iron to make the lines disappear.  On the up side, they DID disappear again. 

I tried adding it to my fridge.  But after a half hour in 40 degrees, the lines were still gone.  I didn't try to figure out where the line was between cold that brought back the marks and cold that did not.  But from Pilot's suggestion, I would think it's around 20 degrees F.


Next up, what happens when you wash your stuff in cold?  Will the lines come back?

I just used the coldest tap water, as if it was in the wash.  The lines did not return.  BUT, you can see in the photo below how those ghosts show....it was easy to get their photo holding it up to the window.

I would advise against using this pen to mark things like drapes or perhaps clothing that will show the marks when you're outside and the sun shines behind you. 


One last test - I gave the marks a good, soapy scrub.  They still came back after sitting in my freezer for 5 minutes.

The ability of an iron to get rid of the color didn't seem to change no matter what I did to the fabric.

It was kind of fun, like my own magic show.  Here - gone - here - gone.


I have actually used the pen on fabric since my tests, because it marks so nice and dark, to keep track of where I need to stop for the miter on my binding. It is sooo fast and easy to get the mark to disappear with a hot iron, I wasn't afraid to use it in the seam.

So, if you use a Frixion Pilot to mark your quilts, I would make sure the remaining ghost marks will be hidden in some way by a seam or perhaps your quilting. And if you end up using your fabric item outside on a sleigh ride in the winter cold, you may need to hit it with an iron once again to get rid of all the black lines that will show up.


Friday, February 24, 2012

Almost Done!


Just about done!

I almost had this ready to post yesterday, but my Freshman came home from school and asked if we could go to Macy's for some nice clothes.

The kid lives in track pants or jeans and sweatshirts. And, a blizzard is supposed to be coming in a couple hours.

He says he needs it for Saturday. For a dance.

The Winter Formal (that's what they call Turn-about these days)?! In two Days?!

Yep. I need a suit, Mom.

Well, at least he didn't wait until Friday afternoon to mention this!
And Men's Wearhouse rocks.


Here's my best discovery while making the 18 portfolios. I used my sewing machine's little screw driver to push out the turned corners. The square, but blunt tip did a wonderful job of pushing them out without poking through the stitches or fabric.

I took a bunch of pictures and am getting ready to deliver everything to the school. 

Turn-about and/or portfolio pictures to come after this weekend.

.

Thursday, July 28, 2011

Spray Baste It Baby!

First, thank you for all the kind words for Portia.  She certainly wasn't running around the house and barking, but the house is strangely quite now that she is gone. 

That's saying something, as there are still three boys in the house that are getting to the end of summer vacation and will argue about ANYTHING.   Which muscle is the strongest (tongue or heart), if you put dry ice on your arm would it freeze your skin from the outside or burn you from the inside, and would you classify Black Jack as a type of poker or is it a game unto itself.  All earth shattering topics - debated endlessly - with no resolution even with internet found facts.  I think that dry ice thing has been going on for at least a week and a half now.

High Dive!

We did have some fun Tuesday watching Becket try out the high dive, though.  And finish up swim lessons.

Blue Popsicle

I have a couple quilts ready for binding as we travel, and I was super excited with trying all kinds of new stuff on them.  For the batting I actually used up some scraps by joining two pieces.  It worked so well!

Ready to bind

And I think I have ditched the pins forever.  All the cool kids are using spray baste, I had some stashed away that was bought with a JoAnn's coupon, and finally decided to give it a try.

spray basted

LOVED it.  Not a single pucker, which was my biggest worry.  And it didn't seem too messy.  

I hate the whole basting process, which is probably why I have so many tops just waiting to be quilted.  This took so much less time and I loved not having to unpin while stippling.  I also ordered some 505 that just arrived.  I'll try it next and compare!

Spray Baste

Wednesday, October 06, 2010

Rulers!

 Did you see this?  
It's my name at the bottom of Pat Sloan's post today!


 Seriously, I screamed.  And Mark came running to ask if there was a mouse or something bad.  
Nope.  Just the winner of a fantastic prize!


I get one of each - I'm especially excited about the 16.5" square.  I hate squaring up using just my mat grid.  I don't think it's as accurate.

And they sharpen your rotary blade as you cut.  How cool is that.

AND it's not fabric - a prize that doesn't count against my stash.  
Awesome 
(especially since I was forced to place a FabricShack order this week - more on that when it arrives)


I can't wait for them to arrive.   I think I could have used them and their grippy backs on this lovely diamond block.  

Both of those fabrics are beautiful voile.  My first time working with it, and it's a bit slippery!  Plus it's a swap block and the fabric was limited and not mine.  So super nervous about missing a cut.

I do love that sophisticated Anna Maria Horner, though!

Wednesday, July 14, 2010

Circle Tip

I wanted to share my tip for doing circles like the raw edge in the last post and the turned/pieced ones I've done for past quilts.


Use a CD. It is the perfect size for a charm pack! And I have also found that the curve is nice for stitching - I can usually make it around the edge, gently turning, without having to stop and constantly adjust my angle.


And look, it was posing so nicely on my new Dream On charm pack {and a few extra treats} - my goodie bag from Heather's birthday party. Amy sent it from Australia - that is some of the coolest mail to get. Seriously, Australia is so far away, and even with all the great blogs I read from there, it's hard for me to think of it as a real place sometimes.


At the same time my mail box had this swap from Julie. She sent along some extra Hawaii charms from Natalie - and a bit of yardage. I have a plan for my Hawaii trip fabric and this is the perfect addition. And it was a swap - so no stash in - woohoo!

So it's a good thing these happy packages arrived, as it may have saved me from a complete implosion. How many days left until school starts?

Evidently I'm ruining my children's lives - they have told me numerous times so I don't forget.

That CD at the top and many others are available because their computer's mouse broke and I refuse to replace it this summer.


TV remotes have gone missing.....(the actual TV was too heavy for me to haul away)


And the Wii tools are also MIA


And look at this poor DVD player from the downstairs TV. You can see my fingerprints in the dust from when I ripped it out of the cabinet, disconnected the ability to hook up to cable, and tossed it in a dark corner.

They WILL *DO* summer.

Tuesday, May 11, 2010

Hexagons! A beginning


I make Hexagons and you should, too! It's a little project that travels very nicely.


If you use freezer paper pieces, the hotel iron comes in handy!


See how great this is? When your child is getting ready for his game, in the cold rain, you can park the van nearby to watch....


And have all you need to work on these little guys right in your lap!


I liked freezer paper since you didn't need pins to hold your scrap in place and it has some body. Regular paper was my least favorite. Too easy to warp your shape I think.

But my favorite was the card stock - I felt like my hexagons were the most neat with the firmer edge. But see how lame my cutting skills are up there!? Even with a nice template download, and using my rotary tool and ruler, I had the worst time with slipping! {This is standard with my cutting in general. I have tried all kinds of things to help. Maybe I should join in on Becket's preschool class to get some tips!}


Anyway, since I like the card stock best, cut terribly, and need UNIFORM hexagons - these pre cuts from Paper Pieces are what I'll use from now on.


I mentioned how freezer paper holds fabric in place nicely - well I tried just holding the fabric in place with the card stock. It was frustrating every time it slipped! Not enough fabric on an edge, or a rumple in the top....I had to pin. But I didn't want to pin through the card stock and bend the shape. A little hole punch is perfect here.


Ignore the random thread! I'm too lazy to go take another one.

This is how I like to baste down my edges. It's a small stitch through just the fabric at the corner, then take one more back stitch in the same spot before moving onto the next corner. I knot at the start, but not at the end.

Here at Sunshine's Creations is a great tutorial that I followed for this part. Huge plus for this method seems to be the ability to just leave those threads in when you're done, instead of pulling them.


I did a few with some Heather Ross poplin cuteness. I found that the poplin tended to kind of bow out and wouldn't stay flat with my finger pressing and just tacking the corners. So I did a few like Camille, actually sewing the corners and mid way on the edges through the paper.

Besides needing to pull all those threads at the end, I didn't enjoy the process as well. I don't know why.


That's as far as I've gotten. Once I decide how I would like to stitch these guys together, I'm interested in finding out if any of the different paper types result in nicer looking joined hexagons. I'll keep you updated as I learn more on my new mini hobby!